 The easiest way to improve the look of your PowerPoint presentations is to keep the slides looking organized. There are some well-known guidelines to have in mind when putting this into practice, such as visual simplicity and minimal text, but have you ever used the actual guidelines to enhance your slide design?
Let’s take a look at PowerPoint’s “Static Guides” feature, along with a few others, to get those slides looking shipshape in time for your next presentation. (Note: the locations of these tools are based on PowerPoint 2011 for Mac, you may wish to look up the locations of these features in your version of PowerPoint .) These powerful yet under-used PowerPoint design features will help you transform your slides from ‘eek’ to ‘sleek.’
Static Guides
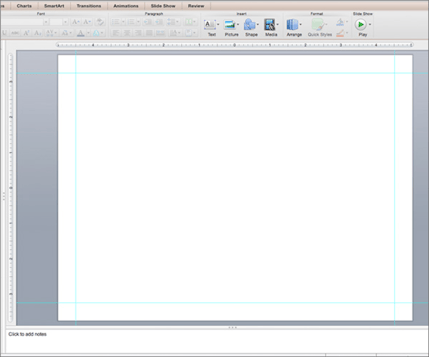
There’s a good reason many people haven’t used these: it simply isn’t obvious how to get started. To access the Static Guides, select View > Guides > Static Guides. A vertical line and a horizontal line will appear on the slide and intersect at the center point. Simply drag a line to move it, and a helpful box will appear telling you where the guide is located according to the slide’s rulers. Here’s the trick: to create new guides, simply hold the Alt key as you drag.

A few well-placed guides can serve as page margins or a basic grid that makes decisions on where to place slide elements extremely simple. How you edit the guides on one slide will effect how they appear on every slide, which helps with presentation-wide visual organization.
Theme Colors
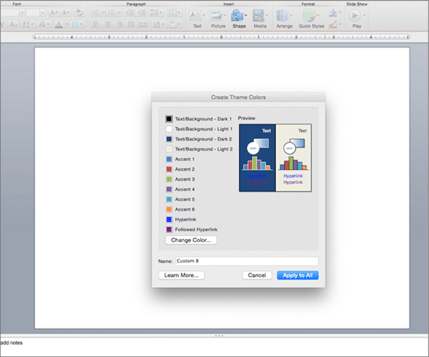
Using consistent color in PowerPoint doesn’t have to be tricky. If you set your theme colors to your liking at the start of your project, you have quick access to the colors you want whenever you need them, and switching out colors across an entire presentation becomes a cinch. To edit the theme colors, go to Format > Theme Colors. You can change them to what you want by double clicking one of the colors and choosing a new color in the pop-up menu. I suggest setting your company’s brand colors as the accent colors in order to give an extra touch of consistency and professionalism.

To try out a different color scheme on your presentation, simply change out one of these theme colors and hit “Apply to All.” This technique can be a real time-saver if you finish creating a presentation and suddenly realize that the bright red background on your slides isn’t as pleasing to the eye as you thought. Save your file as a PowerPoint theme to have access to the same colors on all of your presentations.
Align and Distribute
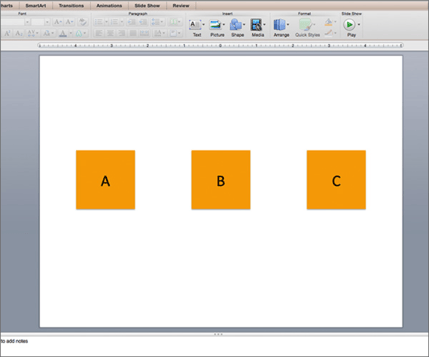
If you are building a slide or a diagram from scratch, the Align and Distribute tools are your best friends. When objects are aligned and distributed properly, your information is more readable and enjoyable. Aligning objects, clearly, brings certain points on two or more objects onto a single imaginary line, while distributing objects creates equal spacing between three or more objects. You can align objects by their edges (top, bottom, left or right) and their centers (vertically or horizontally). To access these tools, click on Arrange > Align or Distribute, and then select the option you wish.

For example, if you wanted to create a diagram with three labeled sections, start with these simple steps:
- Draw a box.
- Draw a text box with centered text, and type the letter “A.”
- Select the box, and select the text box at the same time by holding shift as you click on the text box.
- Align the centers of these objects both vertically and horizontally.
- Group them by Arrange > Group while they are selected – this allows you align and distribute these two objects as a single object.
- Select the group; copy and paste it twice.
- Put the three object groups in the general spots you want them on the slide.
- Select all three groups, and align them as desired (Make sure “Align to Selected Objects” is selected).
- Finally, distribute them to create equal spacing between each object group.
- Label as desired.
You can use these techniques, with a little customization, to create an amazing variety of creatively organized slides and diagrams.
With a little practice, you’ll quickly master these PowerPoint design tools. Setting up Static Guides and Theme Colors at the beginning of the creation process allows the work of slide designing to be almost automatic, and you’ll be illustrating your points with your own custom diagrams in no-time with the Align and Distribute tools.
Now that you’re ready to take your presentations to the next level, put them to work by creating excellent content for your website.


